Volume normalisation and compression

Volume normalisation and compression
by mb@onlinesessions
The signal is too low. What should you do?
All too often you come across an audio file with a very low signal. Most of us would immediately try and fix this by using volume normalisation. While this may be a great tool, it’s well worth understanding what the process is actually doing. In the case of peak normalisation, each track affected will be processed so that samples reach your specified level of normalisation, say 0db. There’s no change in dynamics within the file and it’s essentially no different to manually increasing the volume using faders. Every aspect of the track is increased by the same ratio. The process of normalisation doesn’t set each adjacent track at the same volume, it doesn’t reflect the maximum volume a track can be, nor does it increase the signal to noise ratio. However, beware that once normalised, post processing such as EQ adjustments can result in clipping. By normalising a track you’ll also be increasing the audible noise level. Click here to learn how to reduce the noise in your tracks.
When to use volume normalisation
Every situation is different but it is not recommended to normalise for the sake of it. Nor should you process audio files in any way in a dogmatic fashion. The tool however can be very useful when the faders and gain alone are not sufficient to raise the level within the range of other instruments that are playing alongside.
Why and when to compress
Audio compression be can considered as a process by which specific peaks within an audio file are balanced by reducing their gain. We’ve offered our simple definition here but it does very much simplify the diverse number of parameters you’re able to change with varied effect.
Compressing a file can be of great advantage if done well and when it’s actually needed. As with normalisation, if there’s no need, don’t do it. Use your ears to decide rather than by default. However, by being able to roll off sudden loud notes in a sample, it can give the impression of a smoother performance. For a vocal track, it helps to balance louder choruses with more subtle verses, allowing a vocalist to sing with power and emotion without the volume increasing beyond a reasonable dynamic range. Most instruments can also benefit from careful compression, but its worth experimenting and understanding the effect of each parameter.
The controls
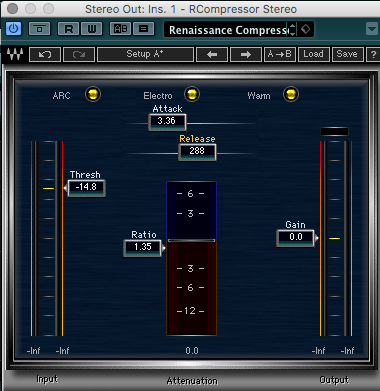
Attack: allows you to specify how quickly the compression kicks in.
Release: enables you to hold the compression for a given period.
Threshold: allows you to set the peak value permitted.
Ratio: this enables you to set the level at which the compression kicks in and to what degree.
Gain: boosts the signal in the same way as raising the fader.
What else is affected by compression?
As with all processing, by effecting one thing, there is a downstream effect that you may find undesirable. This emphasises the attention and skill needed during the performance to minimise the need of post processing. Less is often more, but let’s not mention Yngwie here.
Probably the most notable secondary effect of compression is the tone. You’ll hear audible differences between the tone of compressed sections to the uncompressed regions. Another effect of more aggressive compression is the apparent increase in noise. Yes, there it is again, signal to noise ratio. We have discussed S/N ratios and mic set ups in two other posts. This really does hammer it home how important it is to capture the audio as well as possible in the first place. Noise levels are almost always compounded by processing events.
Where should compression be in the FX Chain?
As with all audio engineering, there’s no correct order, but you’ll need to consider what effect a compressor will have on the sound if the compression is up or downstream in the FX chain. For example, if a reverb was placed before the compression is applied, you may artificially increase the audible level of reverb.
One technique that we found works really well is to have the compression between 2 EQs. The first EQ is used to cut any nasty frequencies, then the compressor ‘evens out’ the signal, whereas the second EQ is used to boost nice frequencies (if necessary). Try it out! The most important thing is to be aware that compression will have a differential audible effect on sound depending on where it is in the FX chain.
Multi band compression
Something a little more complex perhaps, but with multi band compression it’s possible to specifically target the effect to undesirable frequencies. Perhaps you are working on the piano and feel the bass or treble tones are a little to pronounced. Multi band compression allows you to compress these frequencies leaving all others with minimal or negligible alteration. We find this particularly useful when mixing polyphonic instruments where the sample needs a more powerful processing.
Trouble finding the right mix? Send us your track and we’ll get one of our trusted producers to remix your work
Tags: compression, mixing advice, mixing techniques, multiband compression, volume normalisation


